Learn How To Delete Your Facebook Group
Learn How To Delete Your Facebook Group
Learn How To Delete Your Facebook Group


Learn How To Delete Your Facebook Group
Learn How To Delete Your Facebook Group
Seb
Abecasis
in
Community building
Dec 11, 2020
7
min read
Seb
Abecasis
in
Dec 11, 2020
Community building
7
7
min read
Contents
Title
Title
Are you wondering how to delete a Facebook Group?
If so, in this article we’ll cover the ins and outs of deleting a Facebook Group.
Why delete your Facebook Group?
Lots of people want to find out how to delete a Facebook Group these days. In fact, it’s becoming more and more common for people to get rid of their Facebook Groups or Page, and set up an alternative community or group elsewhere.
In general, people who want to delete a Facebook Group do it for one of the following reasons:
Fed up with too many ads on Facebook
Don’t trust Facebook with their data, or concerned with security issues
Too many annoying notifications
People have lost interest in the group - declining membership
They have found a superior alternative that is more aligned with their group’s needs.
Not able to monetize their Group
Fear of their Group being banned and losing all of their hard work virtually overnight
Not being able to effectively store any content they share making it difficult for their members to find resources.
It can be tough to leave a Facebook group. Maybe you've outgrown it, or the people in the group are no longer the type of people you want to associate with. Whatever the reason, sometimes you just need to delete a Facebook group. But how? In this article, we'll walk you through the easy steps to permanently delete a Facebook group.
Who can delete a Facebook Group?
The rules for deleting a Facebook Group are pretty simple.
There are only two types of users that can delete a Group - the owner or admin.
Owner - The group owner has the option to delete the group, but this only becomes available once all other members have left. The Facebook Group owner will need to remove all the members from the group first. Once this is done, the group owner can simply click on the option to delete the group and it will be removed from Facebook.Admin - Admin group members can only delete a group if all members have left, including the original owner. Alternatively, admins can archive a Facebook Group while members, including the owner, are still present in the group. Archiving the group is an alternative to deletion, which means that the group no longer appears to non-members in the Facebook search function, and it prevents new members from joining.
How to archive or delete a Facebook Group via your web browser
In this section, we’ll walk you through the exact process you need to follow to either archive or delete your Facebook Group using any web browser such as Microsoft Edge, Google Chrome, or Mozilla Firefox.
Archive A Facebook Group Via Your Web Browser
To archive a Facebook Group you must have admin rights, either as the owner or given to you by the owner.
Step 1: Log in to Facebook and find the group you want to archive by clicking the Group menu on the left-hand side of the screen. The group may be listed below or you may need to use the search function. Click on the name of the group you want to archive to navigate to the group management page.

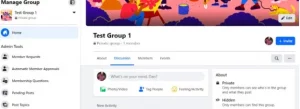
Step 2: On the “Manage Group” page, click the three-dot menu icon below and to the right of the group’s title bar.
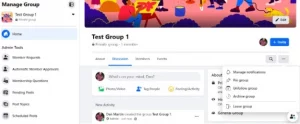
Step 3: Click “Archive Group” from the drop-down menu to begin the process.
Step 4: A dialogue box will appear asking you to confirm your action. If you’re sure you want to go ahead and archive the group, click “confirm”. You can always unarchive the group at a later date.
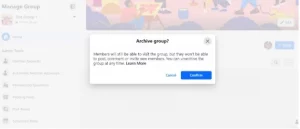
And Voila! Your Facebook Group is now archived, which means members can still visit the group, but are unable to post, comment, or invite new members.
How to delete a Facebook Group via your web browser
Before going any further it should be noted that once deleted, your Group cannot be recovered.
If you want to keep your group, but prevent new members from joining and reduce activity, as an alternative you can archive the group (see instructions above). If you want to keep the group content such as videos, images, and other media, you will need to go through and download the items individually, as there is no way to back them up (at the time of writing).
To delete a Facebook Group, you need to be either the group owner or admin to a group from which the original owner has left.
Step 1: Before deleting the group, you need to remove all the members. Go to the group management page and click the Members heading in the main window.
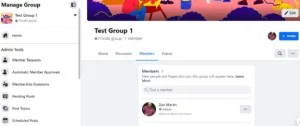
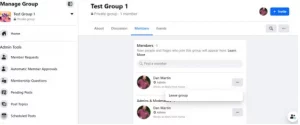
Step 2: Click the three dots next to the members you want to remove, then select “remove from group”.Step 3: When you are the only member left in the group, you are ready to delete the Facebook Group. Click the three dots next to your name and select “Leave group”.
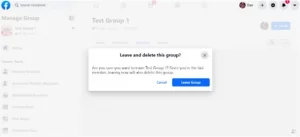
Step 4: When you click “Leave group”, a dialogue box will appear asking you to confirm that you want to leave the group and delete it permanently. Click “Leave Group” to go ahead and delete the group for good.
How to delete a Facebook Group via the mobile app
This section will set out the exact process you need to follow to delete your Facebook Group using the mobile app on any device. There is no option to archive a Facebook Group on the mobile app.
Delete a Facebook Group via your mobile app.
To delete a Facebook Group you must be the group owner, or an admin member of a group in which the original owner has left.
Step 1: Open the Facebook app and tap the three lines icon on the top right-hand corner of the screen to open the main menu.Step 2: Select groups and find the group you want to delete by tapping the Group menu on the left hand side of the screen. Once you are on the group page, tap the tool logo in the top right-hand corner of the screen.

Step 3: On the next page, tap the Members option.
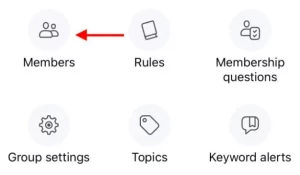
Step 4: Go through each member and remove them from the group one-by-one by tapping their name and selecting “Remove from group”.

Step 5: When you are the only member left in the group, go to the tools menu, select “Admin tools” and tap the menu option to “Leave group”.
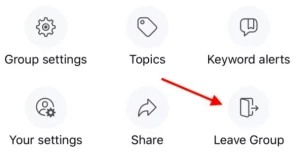
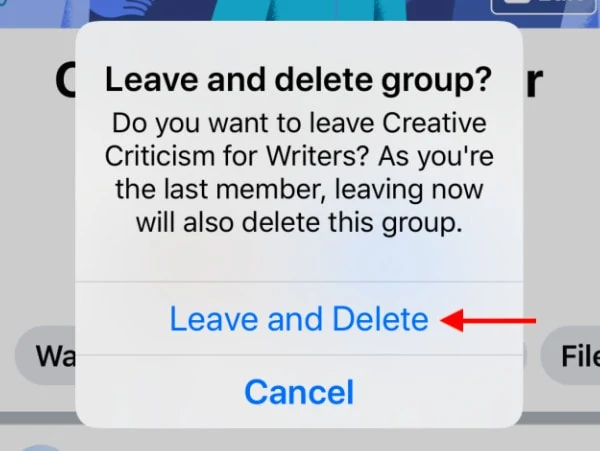
Step 6: You will be prompted to confirm whether you want to leave and delete the group for good. Tap “Confirm” to go ahead and delete the group.
How to unpublish or delete a Facebook Page
If you are looking to delete or unpublish a Facebook page rather than a group, simply follow the instructions below.
Please note that unpublishing a Facebook page means that you hide the page from public view for a period of time, but it is archived and can be restored at any time. Deleting a page will permanently remove it and you won’t be able to recover it.
Unpublish a Facebook Page
Step 1: Navigate to the Facebook page you want to unpublish, then select Settings from the top right-hand corner of the page.

Step 2: Go to the Page Visibility section of the settings page and toggle to “Page unpublished”, then click “Save Changes”. The Facebook page is now unpublished. You will still be able to see it, and to republish, simply navigate back to this page and toggle to “Page published”.

How to delete a Facebook Page
To delete a Facebook page, you must be the owner of the page.
Step 1: Navigate to the Facebook page you want to delete, then select Settings from the top right-hand corner of the page.

Step 2: Scroll down until you reach the “Remove Page” section and click “Edit” on the right-hand side of the page.
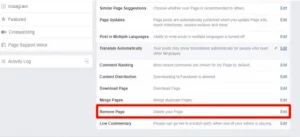
Step 3: Click the option that says “Permanently delete” alongside the name of the page you want to delete.
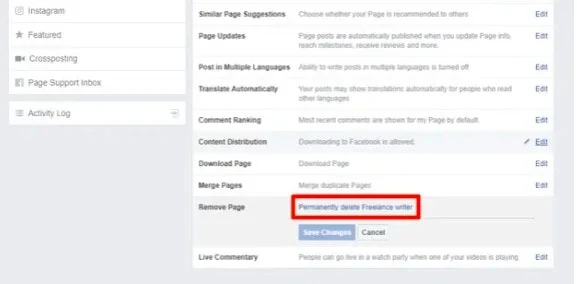
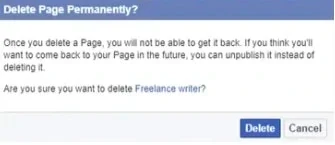
Step 4: Select “Delete” from the confirmation box that pops up and the page will be permanently deleted from Facebook.
Benefits of using a Facebook Group alternative
If you’re considering deleting or archiving your Facebook Group or page, then it may be worth considering some of the benefits of using a different option.
There are a number of alternatives to Facebook Groups out there these days, including community platform builders which allow you to create bespoke communities around your niche or brand, and community platform apps that make it easy to create groups that you have control over (unlike Facebook).
Here are some of the main benefits of using an independent community platform rather than a social media site such as Facebook:
More customisation - You can add your own style and branding to the group, including the theme design, layout, and features.
Full access and control over data - With Facebook Groups, you don’t own any of the data, and you have very little control over it. In fact, you can’t even get access to most of it, as Facebook keeps it for themselves to power their advertising service. With your own community, you can keep and analyse all the data, giving you valuable insights into your community and helping with decision making.
Improved communication and feedback - You can ask group members what group and functions features they want, then see if it’s possible to add them. Some community platforms such as Disciple allow you to add APIs and plugins to diversify the user experience.
Improved monetization opportunities - Community platforms such as Disciple increase your ability to monetize your audience. For instance, you can create tiered memberships which allow access to gated content, or sell admission or tickets to exclusive courses, webinars, etc.
To discover more about why to consider Facebook Group alternatives and what options are available, click here.
Final Thoughts
It’s little wonder that how to delete or archive a Facebook Group has become a commonly asked question in recent years.
Facebook has been rocked by data scandals (such as Cambridge Analytica), and users are disillusioned with the increased advertising, political interference, and algorithm changes that can render groups unfindable at the flick of a switch.
Hopefully this article will help you to achieve your goal of suspending or deleting your Facebook Group, and has also opened your eyes to some of the alternatives out there.

Are you wondering how to delete a Facebook Group?
If so, in this article we’ll cover the ins and outs of deleting a Facebook Group.
Why delete your Facebook Group?
Lots of people want to find out how to delete a Facebook Group these days. In fact, it’s becoming more and more common for people to get rid of their Facebook Groups or Page, and set up an alternative community or group elsewhere.
In general, people who want to delete a Facebook Group do it for one of the following reasons:
Fed up with too many ads on Facebook
Don’t trust Facebook with their data, or concerned with security issues
Too many annoying notifications
People have lost interest in the group - declining membership
They have found a superior alternative that is more aligned with their group’s needs.
Not able to monetize their Group
Fear of their Group being banned and losing all of their hard work virtually overnight
Not being able to effectively store any content they share making it difficult for their members to find resources.
It can be tough to leave a Facebook group. Maybe you've outgrown it, or the people in the group are no longer the type of people you want to associate with. Whatever the reason, sometimes you just need to delete a Facebook group. But how? In this article, we'll walk you through the easy steps to permanently delete a Facebook group.
Who can delete a Facebook Group?
The rules for deleting a Facebook Group are pretty simple.
There are only two types of users that can delete a Group - the owner or admin.
Owner - The group owner has the option to delete the group, but this only becomes available once all other members have left. The Facebook Group owner will need to remove all the members from the group first. Once this is done, the group owner can simply click on the option to delete the group and it will be removed from Facebook.Admin - Admin group members can only delete a group if all members have left, including the original owner. Alternatively, admins can archive a Facebook Group while members, including the owner, are still present in the group. Archiving the group is an alternative to deletion, which means that the group no longer appears to non-members in the Facebook search function, and it prevents new members from joining.
How to archive or delete a Facebook Group via your web browser
In this section, we’ll walk you through the exact process you need to follow to either archive or delete your Facebook Group using any web browser such as Microsoft Edge, Google Chrome, or Mozilla Firefox.
Archive A Facebook Group Via Your Web Browser
To archive a Facebook Group you must have admin rights, either as the owner or given to you by the owner.
Step 1: Log in to Facebook and find the group you want to archive by clicking the Group menu on the left-hand side of the screen. The group may be listed below or you may need to use the search function. Click on the name of the group you want to archive to navigate to the group management page.

Step 2: On the “Manage Group” page, click the three-dot menu icon below and to the right of the group’s title bar.

Step 3: Click “Archive Group” from the drop-down menu to begin the process.

Step 4: A dialogue box will appear asking you to confirm your action. If you’re sure you want to go ahead and archive the group, click “confirm”. You can always unarchive the group at a later date.

And Voila! Your Facebook Group is now archived, which means members can still visit the group, but are unable to post, comment, or invite new members.
How to delete a Facebook Group via your web browser
Before going any further it should be noted that once deleted, your Group cannot be recovered.
If you want to keep your group, but prevent new members from joining and reduce activity, as an alternative you can archive the group (see instructions above). If you want to keep the group content such as videos, images, and other media, you will need to go through and download the items individually, as there is no way to back them up (at the time of writing).
To delete a Facebook Group, you need to be either the group owner or admin to a group from which the original owner has left.
Step 1: Before deleting the group, you need to remove all the members. Go to the group management page and click the Members heading in the main window.

Step 2: Click the three dots next to the members you want to remove, then select “remove from group”.Step 3: When you are the only member left in the group, you are ready to delete the Facebook Group. Click the three dots next to your name and select “Leave group”.

Step 4: When you click “Leave group”, a dialogue box will appear asking you to confirm that you want to leave the group and delete it permanently. Click “Leave Group” to go ahead and delete the group for good.

How to delete a Facebook Group via the mobile app
This section will set out the exact process you need to follow to delete your Facebook Group using the mobile app on any device. There is no option to archive a Facebook Group on the mobile app.
Delete a Facebook Group via your mobile app.
To delete a Facebook Group you must be the group owner, or an admin member of a group in which the original owner has left.
Step 1: Open the Facebook app and tap the three lines icon on the top right-hand corner of the screen to open the main menu.Step 2: Select groups and find the group you want to delete by tapping the Group menu on the left hand side of the screen. Once you are on the group page, tap the tool logo in the top right-hand corner of the screen.

Step 3: On the next page, tap the Members option.

Step 4: Go through each member and remove them from the group one-by-one by tapping their name and selecting “Remove from group”.

Step 5: When you are the only member left in the group, go to the tools menu, select “Admin tools” and tap the menu option to “Leave group”.

Step 6: You will be prompted to confirm whether you want to leave and delete the group for good. Tap “Confirm” to go ahead and delete the group.

How to unpublish or delete a Facebook Page
If you are looking to delete or unpublish a Facebook page rather than a group, simply follow the instructions below.
Please note that unpublishing a Facebook page means that you hide the page from public view for a period of time, but it is archived and can be restored at any time. Deleting a page will permanently remove it and you won’t be able to recover it.
Unpublish a Facebook Page
Step 1: Navigate to the Facebook page you want to unpublish, then select Settings from the top right-hand corner of the page.

Step 2: Go to the Page Visibility section of the settings page and toggle to “Page unpublished”, then click “Save Changes”. The Facebook page is now unpublished. You will still be able to see it, and to republish, simply navigate back to this page and toggle to “Page published”.

How to delete a Facebook Page
To delete a Facebook page, you must be the owner of the page.
Step 1: Navigate to the Facebook page you want to delete, then select Settings from the top right-hand corner of the page.

Step 2: Scroll down until you reach the “Remove Page” section and click “Edit” on the right-hand side of the page.

Step 3: Click the option that says “Permanently delete” alongside the name of the page you want to delete.

Step 4: Select “Delete” from the confirmation box that pops up and the page will be permanently deleted from Facebook.

Benefits of using a Facebook Group alternative
If you’re considering deleting or archiving your Facebook Group or page, then it may be worth considering some of the benefits of using a different option.
There are a number of alternatives to Facebook Groups out there these days, including community platform builders which allow you to create bespoke communities around your niche or brand, and community platform apps that make it easy to create groups that you have control over (unlike Facebook).
Here are some of the main benefits of using an independent community platform rather than a social media site such as Facebook:
More customisation - You can add your own style and branding to the group, including the theme design, layout, and features.
Full access and control over data - With Facebook Groups, you don’t own any of the data, and you have very little control over it. In fact, you can’t even get access to most of it, as Facebook keeps it for themselves to power their advertising service. With your own community, you can keep and analyse all the data, giving you valuable insights into your community and helping with decision making.
Improved communication and feedback - You can ask group members what group and functions features they want, then see if it’s possible to add them. Some community platforms such as Disciple allow you to add APIs and plugins to diversify the user experience.
Improved monetization opportunities - Community platforms such as Disciple increase your ability to monetize your audience. For instance, you can create tiered memberships which allow access to gated content, or sell admission or tickets to exclusive courses, webinars, etc.
To discover more about why to consider Facebook Group alternatives and what options are available, click here.
Final Thoughts
It’s little wonder that how to delete or archive a Facebook Group has become a commonly asked question in recent years.
Facebook has been rocked by data scandals (such as Cambridge Analytica), and users are disillusioned with the increased advertising, political interference, and algorithm changes that can render groups unfindable at the flick of a switch.
Hopefully this article will help you to achieve your goal of suspending or deleting your Facebook Group, and has also opened your eyes to some of the alternatives out there.

Seb
Abecasis
in
Dec 11, 2020
7
min read
Community building
Seb
Abecasis
in
Community building
Dec 11, 2020
7
min read
See how a Disciple community app can elevate your business
Are you wondering how to delete a Facebook Group?
If so, in this article we’ll cover the ins and outs of deleting a Facebook Group.
Why delete your Facebook Group?
Lots of people want to find out how to delete a Facebook Group these days. In fact, it’s becoming more and more common for people to get rid of their Facebook Groups or Page, and set up an alternative community or group elsewhere.
In general, people who want to delete a Facebook Group do it for one of the following reasons:
Fed up with too many ads on Facebook
Don’t trust Facebook with their data, or concerned with security issues
Too many annoying notifications
People have lost interest in the group - declining membership
They have found a superior alternative that is more aligned with their group’s needs.
Not able to monetize their Group
Fear of their Group being banned and losing all of their hard work virtually overnight
Not being able to effectively store any content they share making it difficult for their members to find resources.
It can be tough to leave a Facebook group. Maybe you've outgrown it, or the people in the group are no longer the type of people you want to associate with. Whatever the reason, sometimes you just need to delete a Facebook group. But how? In this article, we'll walk you through the easy steps to permanently delete a Facebook group.
Who can delete a Facebook Group?
The rules for deleting a Facebook Group are pretty simple.
There are only two types of users that can delete a Group - the owner or admin.
Owner - The group owner has the option to delete the group, but this only becomes available once all other members have left. The Facebook Group owner will need to remove all the members from the group first. Once this is done, the group owner can simply click on the option to delete the group and it will be removed from Facebook.Admin - Admin group members can only delete a group if all members have left, including the original owner. Alternatively, admins can archive a Facebook Group while members, including the owner, are still present in the group. Archiving the group is an alternative to deletion, which means that the group no longer appears to non-members in the Facebook search function, and it prevents new members from joining.
How to archive or delete a Facebook Group via your web browser
In this section, we’ll walk you through the exact process you need to follow to either archive or delete your Facebook Group using any web browser such as Microsoft Edge, Google Chrome, or Mozilla Firefox.
Archive A Facebook Group Via Your Web Browser
To archive a Facebook Group you must have admin rights, either as the owner or given to you by the owner.
Step 1: Log in to Facebook and find the group you want to archive by clicking the Group menu on the left-hand side of the screen. The group may be listed below or you may need to use the search function. Click on the name of the group you want to archive to navigate to the group management page.

Step 2: On the “Manage Group” page, click the three-dot menu icon below and to the right of the group’s title bar.

Step 3: Click “Archive Group” from the drop-down menu to begin the process.

Step 4: A dialogue box will appear asking you to confirm your action. If you’re sure you want to go ahead and archive the group, click “confirm”. You can always unarchive the group at a later date.

And Voila! Your Facebook Group is now archived, which means members can still visit the group, but are unable to post, comment, or invite new members.
How to delete a Facebook Group via your web browser
Before going any further it should be noted that once deleted, your Group cannot be recovered.
If you want to keep your group, but prevent new members from joining and reduce activity, as an alternative you can archive the group (see instructions above). If you want to keep the group content such as videos, images, and other media, you will need to go through and download the items individually, as there is no way to back them up (at the time of writing).
To delete a Facebook Group, you need to be either the group owner or admin to a group from which the original owner has left.
Step 1: Before deleting the group, you need to remove all the members. Go to the group management page and click the Members heading in the main window.

Step 2: Click the three dots next to the members you want to remove, then select “remove from group”.Step 3: When you are the only member left in the group, you are ready to delete the Facebook Group. Click the three dots next to your name and select “Leave group”.

Step 4: When you click “Leave group”, a dialogue box will appear asking you to confirm that you want to leave the group and delete it permanently. Click “Leave Group” to go ahead and delete the group for good.

How to delete a Facebook Group via the mobile app
This section will set out the exact process you need to follow to delete your Facebook Group using the mobile app on any device. There is no option to archive a Facebook Group on the mobile app.
Delete a Facebook Group via your mobile app.
To delete a Facebook Group you must be the group owner, or an admin member of a group in which the original owner has left.
Step 1: Open the Facebook app and tap the three lines icon on the top right-hand corner of the screen to open the main menu.Step 2: Select groups and find the group you want to delete by tapping the Group menu on the left hand side of the screen. Once you are on the group page, tap the tool logo in the top right-hand corner of the screen.

Step 3: On the next page, tap the Members option.

Step 4: Go through each member and remove them from the group one-by-one by tapping their name and selecting “Remove from group”.

Step 5: When you are the only member left in the group, go to the tools menu, select “Admin tools” and tap the menu option to “Leave group”.

Step 6: You will be prompted to confirm whether you want to leave and delete the group for good. Tap “Confirm” to go ahead and delete the group.

How to unpublish or delete a Facebook Page
If you are looking to delete or unpublish a Facebook page rather than a group, simply follow the instructions below.
Please note that unpublishing a Facebook page means that you hide the page from public view for a period of time, but it is archived and can be restored at any time. Deleting a page will permanently remove it and you won’t be able to recover it.
Unpublish a Facebook Page
Step 1: Navigate to the Facebook page you want to unpublish, then select Settings from the top right-hand corner of the page.

Step 2: Go to the Page Visibility section of the settings page and toggle to “Page unpublished”, then click “Save Changes”. The Facebook page is now unpublished. You will still be able to see it, and to republish, simply navigate back to this page and toggle to “Page published”.

How to delete a Facebook Page
To delete a Facebook page, you must be the owner of the page.
Step 1: Navigate to the Facebook page you want to delete, then select Settings from the top right-hand corner of the page.

Step 2: Scroll down until you reach the “Remove Page” section and click “Edit” on the right-hand side of the page.

Step 3: Click the option that says “Permanently delete” alongside the name of the page you want to delete.

Step 4: Select “Delete” from the confirmation box that pops up and the page will be permanently deleted from Facebook.

Benefits of using a Facebook Group alternative
If you’re considering deleting or archiving your Facebook Group or page, then it may be worth considering some of the benefits of using a different option.
There are a number of alternatives to Facebook Groups out there these days, including community platform builders which allow you to create bespoke communities around your niche or brand, and community platform apps that make it easy to create groups that you have control over (unlike Facebook).
Here are some of the main benefits of using an independent community platform rather than a social media site such as Facebook:
More customisation - You can add your own style and branding to the group, including the theme design, layout, and features.
Full access and control over data - With Facebook Groups, you don’t own any of the data, and you have very little control over it. In fact, you can’t even get access to most of it, as Facebook keeps it for themselves to power their advertising service. With your own community, you can keep and analyse all the data, giving you valuable insights into your community and helping with decision making.
Improved communication and feedback - You can ask group members what group and functions features they want, then see if it’s possible to add them. Some community platforms such as Disciple allow you to add APIs and plugins to diversify the user experience.
Improved monetization opportunities - Community platforms such as Disciple increase your ability to monetize your audience. For instance, you can create tiered memberships which allow access to gated content, or sell admission or tickets to exclusive courses, webinars, etc.
To discover more about why to consider Facebook Group alternatives and what options are available, click here.
Final Thoughts
It’s little wonder that how to delete or archive a Facebook Group has become a commonly asked question in recent years.
Facebook has been rocked by data scandals (such as Cambridge Analytica), and users are disillusioned with the increased advertising, political interference, and algorithm changes that can render groups unfindable at the flick of a switch.
Hopefully this article will help you to achieve your goal of suspending or deleting your Facebook Group, and has also opened your eyes to some of the alternatives out there.

Are you wondering how to delete a Facebook Group?
If so, in this article we’ll cover the ins and outs of deleting a Facebook Group.
Why delete your Facebook Group?
Lots of people want to find out how to delete a Facebook Group these days. In fact, it’s becoming more and more common for people to get rid of their Facebook Groups or Page, and set up an alternative community or group elsewhere.
In general, people who want to delete a Facebook Group do it for one of the following reasons:
Fed up with too many ads on Facebook
Don’t trust Facebook with their data, or concerned with security issues
Too many annoying notifications
People have lost interest in the group - declining membership
They have found a superior alternative that is more aligned with their group’s needs.
Not able to monetize their Group
Fear of their Group being banned and losing all of their hard work virtually overnight
Not being able to effectively store any content they share making it difficult for their members to find resources.
It can be tough to leave a Facebook group. Maybe you've outgrown it, or the people in the group are no longer the type of people you want to associate with. Whatever the reason, sometimes you just need to delete a Facebook group. But how? In this article, we'll walk you through the easy steps to permanently delete a Facebook group.
Who can delete a Facebook Group?
The rules for deleting a Facebook Group are pretty simple.
There are only two types of users that can delete a Group - the owner or admin.
Owner - The group owner has the option to delete the group, but this only becomes available once all other members have left. The Facebook Group owner will need to remove all the members from the group first. Once this is done, the group owner can simply click on the option to delete the group and it will be removed from Facebook.Admin - Admin group members can only delete a group if all members have left, including the original owner. Alternatively, admins can archive a Facebook Group while members, including the owner, are still present in the group. Archiving the group is an alternative to deletion, which means that the group no longer appears to non-members in the Facebook search function, and it prevents new members from joining.
How to archive or delete a Facebook Group via your web browser
In this section, we’ll walk you through the exact process you need to follow to either archive or delete your Facebook Group using any web browser such as Microsoft Edge, Google Chrome, or Mozilla Firefox.
Archive A Facebook Group Via Your Web Browser
To archive a Facebook Group you must have admin rights, either as the owner or given to you by the owner.
Step 1: Log in to Facebook and find the group you want to archive by clicking the Group menu on the left-hand side of the screen. The group may be listed below or you may need to use the search function. Click on the name of the group you want to archive to navigate to the group management page.

Step 2: On the “Manage Group” page, click the three-dot menu icon below and to the right of the group’s title bar.

Step 3: Click “Archive Group” from the drop-down menu to begin the process.

Step 4: A dialogue box will appear asking you to confirm your action. If you’re sure you want to go ahead and archive the group, click “confirm”. You can always unarchive the group at a later date.

And Voila! Your Facebook Group is now archived, which means members can still visit the group, but are unable to post, comment, or invite new members.
How to delete a Facebook Group via your web browser
Before going any further it should be noted that once deleted, your Group cannot be recovered.
If you want to keep your group, but prevent new members from joining and reduce activity, as an alternative you can archive the group (see instructions above). If you want to keep the group content such as videos, images, and other media, you will need to go through and download the items individually, as there is no way to back them up (at the time of writing).
To delete a Facebook Group, you need to be either the group owner or admin to a group from which the original owner has left.
Step 1: Before deleting the group, you need to remove all the members. Go to the group management page and click the Members heading in the main window.

Step 2: Click the three dots next to the members you want to remove, then select “remove from group”.Step 3: When you are the only member left in the group, you are ready to delete the Facebook Group. Click the three dots next to your name and select “Leave group”.

Step 4: When you click “Leave group”, a dialogue box will appear asking you to confirm that you want to leave the group and delete it permanently. Click “Leave Group” to go ahead and delete the group for good.

How to delete a Facebook Group via the mobile app
This section will set out the exact process you need to follow to delete your Facebook Group using the mobile app on any device. There is no option to archive a Facebook Group on the mobile app.
Delete a Facebook Group via your mobile app.
To delete a Facebook Group you must be the group owner, or an admin member of a group in which the original owner has left.
Step 1: Open the Facebook app and tap the three lines icon on the top right-hand corner of the screen to open the main menu.Step 2: Select groups and find the group you want to delete by tapping the Group menu on the left hand side of the screen. Once you are on the group page, tap the tool logo in the top right-hand corner of the screen.

Step 3: On the next page, tap the Members option.

Step 4: Go through each member and remove them from the group one-by-one by tapping their name and selecting “Remove from group”.

Step 5: When you are the only member left in the group, go to the tools menu, select “Admin tools” and tap the menu option to “Leave group”.

Step 6: You will be prompted to confirm whether you want to leave and delete the group for good. Tap “Confirm” to go ahead and delete the group.

How to unpublish or delete a Facebook Page
If you are looking to delete or unpublish a Facebook page rather than a group, simply follow the instructions below.
Please note that unpublishing a Facebook page means that you hide the page from public view for a period of time, but it is archived and can be restored at any time. Deleting a page will permanently remove it and you won’t be able to recover it.
Unpublish a Facebook Page
Step 1: Navigate to the Facebook page you want to unpublish, then select Settings from the top right-hand corner of the page.

Step 2: Go to the Page Visibility section of the settings page and toggle to “Page unpublished”, then click “Save Changes”. The Facebook page is now unpublished. You will still be able to see it, and to republish, simply navigate back to this page and toggle to “Page published”.

How to delete a Facebook Page
To delete a Facebook page, you must be the owner of the page.
Step 1: Navigate to the Facebook page you want to delete, then select Settings from the top right-hand corner of the page.

Step 2: Scroll down until you reach the “Remove Page” section and click “Edit” on the right-hand side of the page.

Step 3: Click the option that says “Permanently delete” alongside the name of the page you want to delete.

Step 4: Select “Delete” from the confirmation box that pops up and the page will be permanently deleted from Facebook.

Benefits of using a Facebook Group alternative
If you’re considering deleting or archiving your Facebook Group or page, then it may be worth considering some of the benefits of using a different option.
There are a number of alternatives to Facebook Groups out there these days, including community platform builders which allow you to create bespoke communities around your niche or brand, and community platform apps that make it easy to create groups that you have control over (unlike Facebook).
Here are some of the main benefits of using an independent community platform rather than a social media site such as Facebook:
More customisation - You can add your own style and branding to the group, including the theme design, layout, and features.
Full access and control over data - With Facebook Groups, you don’t own any of the data, and you have very little control over it. In fact, you can’t even get access to most of it, as Facebook keeps it for themselves to power their advertising service. With your own community, you can keep and analyse all the data, giving you valuable insights into your community and helping with decision making.
Improved communication and feedback - You can ask group members what group and functions features they want, then see if it’s possible to add them. Some community platforms such as Disciple allow you to add APIs and plugins to diversify the user experience.
Improved monetization opportunities - Community platforms such as Disciple increase your ability to monetize your audience. For instance, you can create tiered memberships which allow access to gated content, or sell admission or tickets to exclusive courses, webinars, etc.
To discover more about why to consider Facebook Group alternatives and what options are available, click here.
Final Thoughts
It’s little wonder that how to delete or archive a Facebook Group has become a commonly asked question in recent years.
Facebook has been rocked by data scandals (such as Cambridge Analytica), and users are disillusioned with the increased advertising, political interference, and algorithm changes that can render groups unfindable at the flick of a switch.
Hopefully this article will help you to achieve your goal of suspending or deleting your Facebook Group, and has also opened your eyes to some of the alternatives out there.

Are you wondering how to delete a Facebook Group?
If so, in this article we’ll cover the ins and outs of deleting a Facebook Group.
Why delete your Facebook Group?
Lots of people want to find out how to delete a Facebook Group these days. In fact, it’s becoming more and more common for people to get rid of their Facebook Groups or Page, and set up an alternative community or group elsewhere.
In general, people who want to delete a Facebook Group do it for one of the following reasons:
Fed up with too many ads on Facebook
Don’t trust Facebook with their data, or concerned with security issues
Too many annoying notifications
People have lost interest in the group - declining membership
They have found a superior alternative that is more aligned with their group’s needs.
Not able to monetize their Group
Fear of their Group being banned and losing all of their hard work virtually overnight
Not being able to effectively store any content they share making it difficult for their members to find resources.
It can be tough to leave a Facebook group. Maybe you've outgrown it, or the people in the group are no longer the type of people you want to associate with. Whatever the reason, sometimes you just need to delete a Facebook group. But how? In this article, we'll walk you through the easy steps to permanently delete a Facebook group.
Who can delete a Facebook Group?
The rules for deleting a Facebook Group are pretty simple.
There are only two types of users that can delete a Group - the owner or admin.
Owner - The group owner has the option to delete the group, but this only becomes available once all other members have left. The Facebook Group owner will need to remove all the members from the group first. Once this is done, the group owner can simply click on the option to delete the group and it will be removed from Facebook.Admin - Admin group members can only delete a group if all members have left, including the original owner. Alternatively, admins can archive a Facebook Group while members, including the owner, are still present in the group. Archiving the group is an alternative to deletion, which means that the group no longer appears to non-members in the Facebook search function, and it prevents new members from joining.
How to archive or delete a Facebook Group via your web browser
In this section, we’ll walk you through the exact process you need to follow to either archive or delete your Facebook Group using any web browser such as Microsoft Edge, Google Chrome, or Mozilla Firefox.
Archive A Facebook Group Via Your Web Browser
To archive a Facebook Group you must have admin rights, either as the owner or given to you by the owner.
Step 1: Log in to Facebook and find the group you want to archive by clicking the Group menu on the left-hand side of the screen. The group may be listed below or you may need to use the search function. Click on the name of the group you want to archive to navigate to the group management page.

Step 2: On the “Manage Group” page, click the three-dot menu icon below and to the right of the group’s title bar.

Step 3: Click “Archive Group” from the drop-down menu to begin the process.

Step 4: A dialogue box will appear asking you to confirm your action. If you’re sure you want to go ahead and archive the group, click “confirm”. You can always unarchive the group at a later date.

And Voila! Your Facebook Group is now archived, which means members can still visit the group, but are unable to post, comment, or invite new members.
How to delete a Facebook Group via your web browser
Before going any further it should be noted that once deleted, your Group cannot be recovered.
If you want to keep your group, but prevent new members from joining and reduce activity, as an alternative you can archive the group (see instructions above). If you want to keep the group content such as videos, images, and other media, you will need to go through and download the items individually, as there is no way to back them up (at the time of writing).
To delete a Facebook Group, you need to be either the group owner or admin to a group from which the original owner has left.
Step 1: Before deleting the group, you need to remove all the members. Go to the group management page and click the Members heading in the main window.

Step 2: Click the three dots next to the members you want to remove, then select “remove from group”.Step 3: When you are the only member left in the group, you are ready to delete the Facebook Group. Click the three dots next to your name and select “Leave group”.

Step 4: When you click “Leave group”, a dialogue box will appear asking you to confirm that you want to leave the group and delete it permanently. Click “Leave Group” to go ahead and delete the group for good.

How to delete a Facebook Group via the mobile app
This section will set out the exact process you need to follow to delete your Facebook Group using the mobile app on any device. There is no option to archive a Facebook Group on the mobile app.
Delete a Facebook Group via your mobile app.
To delete a Facebook Group you must be the group owner, or an admin member of a group in which the original owner has left.
Step 1: Open the Facebook app and tap the three lines icon on the top right-hand corner of the screen to open the main menu.Step 2: Select groups and find the group you want to delete by tapping the Group menu on the left hand side of the screen. Once you are on the group page, tap the tool logo in the top right-hand corner of the screen.

Step 3: On the next page, tap the Members option.

Step 4: Go through each member and remove them from the group one-by-one by tapping their name and selecting “Remove from group”.

Step 5: When you are the only member left in the group, go to the tools menu, select “Admin tools” and tap the menu option to “Leave group”.

Step 6: You will be prompted to confirm whether you want to leave and delete the group for good. Tap “Confirm” to go ahead and delete the group.

How to unpublish or delete a Facebook Page
If you are looking to delete or unpublish a Facebook page rather than a group, simply follow the instructions below.
Please note that unpublishing a Facebook page means that you hide the page from public view for a period of time, but it is archived and can be restored at any time. Deleting a page will permanently remove it and you won’t be able to recover it.
Unpublish a Facebook Page
Step 1: Navigate to the Facebook page you want to unpublish, then select Settings from the top right-hand corner of the page.

Step 2: Go to the Page Visibility section of the settings page and toggle to “Page unpublished”, then click “Save Changes”. The Facebook page is now unpublished. You will still be able to see it, and to republish, simply navigate back to this page and toggle to “Page published”.

How to delete a Facebook Page
To delete a Facebook page, you must be the owner of the page.
Step 1: Navigate to the Facebook page you want to delete, then select Settings from the top right-hand corner of the page.

Step 2: Scroll down until you reach the “Remove Page” section and click “Edit” on the right-hand side of the page.

Step 3: Click the option that says “Permanently delete” alongside the name of the page you want to delete.

Step 4: Select “Delete” from the confirmation box that pops up and the page will be permanently deleted from Facebook.

Benefits of using a Facebook Group alternative
If you’re considering deleting or archiving your Facebook Group or page, then it may be worth considering some of the benefits of using a different option.
There are a number of alternatives to Facebook Groups out there these days, including community platform builders which allow you to create bespoke communities around your niche or brand, and community platform apps that make it easy to create groups that you have control over (unlike Facebook).
Here are some of the main benefits of using an independent community platform rather than a social media site such as Facebook:
More customisation - You can add your own style and branding to the group, including the theme design, layout, and features.
Full access and control over data - With Facebook Groups, you don’t own any of the data, and you have very little control over it. In fact, you can’t even get access to most of it, as Facebook keeps it for themselves to power their advertising service. With your own community, you can keep and analyse all the data, giving you valuable insights into your community and helping with decision making.
Improved communication and feedback - You can ask group members what group and functions features they want, then see if it’s possible to add them. Some community platforms such as Disciple allow you to add APIs and plugins to diversify the user experience.
Improved monetization opportunities - Community platforms such as Disciple increase your ability to monetize your audience. For instance, you can create tiered memberships which allow access to gated content, or sell admission or tickets to exclusive courses, webinars, etc.
To discover more about why to consider Facebook Group alternatives and what options are available, click here.
Final Thoughts
It’s little wonder that how to delete or archive a Facebook Group has become a commonly asked question in recent years.
Facebook has been rocked by data scandals (such as Cambridge Analytica), and users are disillusioned with the increased advertising, political interference, and algorithm changes that can render groups unfindable at the flick of a switch.
Hopefully this article will help you to achieve your goal of suspending or deleting your Facebook Group, and has also opened your eyes to some of the alternatives out there.


